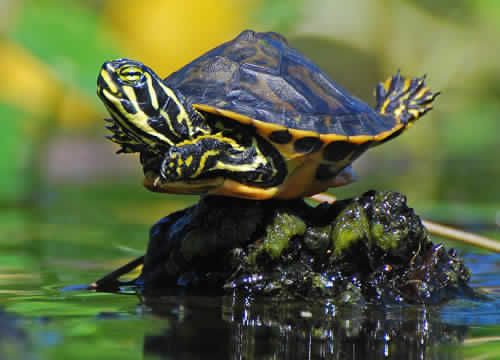
Habitat - Indoor :: 55 Gallon build

Turtle tank setups and other indoor configurations.

Post Posted: Thu Sep 12, 2013 12:10 am   55 Gallon build

So here I am after reading all of your build threads and the entire website/forum, gathering valuable information finally setting up my own turtle tank. Everything that I have learned is from the posts on this forum without it I doubt I would have ever been able to do it this easy. So here we go.. I started looking for some RES on craigslist but I really couldn't find smaller turtles as at this point I live on a second floor appartment and I cant really have anything bigger than a 55 gallon. so I made a post and someone emailed me informing me of the reptile show in the next week. So viola! Sat morning me, wife and the kid went to get our little friends

1.01.jpg
So many turtles!


I had planned on getting two turtles only but couldn't help myself and got 2 RES and 1 YBS

1.02.jpg
Red, Heisenberg and Waffles!
1.02.jpg (20.06 KiB) Viewed 6826 times
Last edited by talal on Thu Sep 12, 2013 12:40 am, edited 1 time in total.
User avatar
talal
 
Posts: 212
Joined: Jul 31, 2013
Location: Carrollton, TX
Gender: Male

Post Posted: Thu Sep 12, 2013 12:24 am   Re: 55 Gallon build

Basic accessories that I researched, I ordered all of my stuff online and saved a bunch of money. an Eheim 2075, Powersun 100 watt & a Deep dome lamp fixture. Just a note when using online vendors try to look up coupons, almost all big websites have something to offer, I got my heater and filter from bigals and i looked up a coupon and instantly got a 10% discount and free shipping

1.1.jpg


first things first! Installed the filter got it going also picked up a Jager heater online. Really love Eheim, I ordered an XP3 at first and had a miserable experience I guess they are not maintaining quality anymore.

2.1.jpg


Safety is important, since much of our equipment is under water and specially canister filters can spill/leak anytime always use a GFCI outlet. I got mine from home depot for about 10 dollars. I couldnt replace my whole outlet so I bought an adapter that I just plugged into the socket. however its best to just replace the whole outlet but since I live in a rented appartment I didnt want to mess around so much
Attachments
2.jpg
The yellow one is the GFCI adapter
2.jpg (18.26 KiB) Viewed 6824 times
User avatar
talal
 
Posts: 212
Joined: Jul 31, 2013
Location: Carrollton, TX
Gender: Male

Post Posted: Thu Sep 12, 2013 12:39 am   Re: 55 Gallon build

I bought my tank on craigslist for $60 with the stand. Pretty sweet deal there, craigslist is the best place to look for tanks that people are trying to get rid of. In my case the guy had the tank in his storage and I asked him to fill it up for me so I could inspect it for leaks before purchasing it. There are a few scratches but nothing too noticeable, I figured I will have to upgrade to a much bigger tank after maybe a year so I just went with it. with everything installed I let my tank run for about 24 hours. The jager heater works really well too and its a pretty solid heater not easily breakable even though it's glass. was a little pain to calibrate, i used a big pot full of water so it would be quicker instead of the tank.

3.jpg


Next step was to setup the basking light, I had bought an exo terra lamp holder bracket and placed it on the side of my tank, however that was a huge mistake! it was almost impossible to move it or get it off so had to go through a huge hassle of removing it with a knife and a razor blade. Had to be really careful there to not scratch my tank. The wife surprise me went to home depot and purchased a plank of wood and painted it to match the color of the tank. I used gorilla glue to attach the bracket to the plank and screwed it on the wall.

4.jpg
5.jpg
User avatar
talal
 
Posts: 212
Joined: Jul 31, 2013
Location: Carrollton, TX
Gender: Male

Post Posted: Thu Sep 12, 2013 12:48 am   Re: 55 Gallon build

For substrate I decided to go with some polished river rocks that I bought at the dollar store for $1 a bag dont remember the weight/quantity per bag but I got about 8 bags and that was enough to have a thin layer of substrate like I wanted it. Easy filtration and less debris trapped! Also decided on some plastic plants, reason being I had no clue how to maintain aquatic plants. There are some that do not require a lot of maintenance but there are so many stories about your turtles eating them so I simply didnt want to spend money on something that would not remain or get ripped up not to ignore the fact that it might get stuck in my filter intake and burn the motor. In order to avoid all of that I bought an exo terra and a fluval (bottom) plant. They give my tank a really nice look, also my turtles love to sleep in the top plant as it's suction cuped on the back wall of the tank. That is probably their favorite thing in the tank, they hang out there all the time, also gives them a great hiding/resting spot due to their small size.

6.000.jpg
User avatar
talal
 
Posts: 212
Joined: Jul 31, 2013
Location: Carrollton, TX
Gender: Male

Post Posted: Thu Sep 12, 2013 1:07 am   Re: 55 Gallon build

I initially went with the zoomed basking platform for a start since it was readily available and works really well for hatchlings. I got the smallest size since I wanted to make a custom basking platform. My initial idea was to get a piece of drift wood kind of shaped like a tree and mount a ceramic tile on top of it so I went driftwood hunting everywhere.. I found a lot of pieces on ebay and amazon but it would cost too much to get them shipped here plus I really wanted to see it in person to get a better idea so I went searching locally and finnally an LFS here had just what I needed

7.jpg


Bought this piece for $40 and it was a little big for my tank so I choped the pointed sides carefully, had to put it in my tank and take it out multiple times to get it exactly right. I have never used a saw before in my life so it took me a while to get it right! once it was a good fit I decided to boil it to get rid of all the tanins. I couldnt really find a pot that big but I scored something cheap at target for $20 and flipped the wood around couple times to boil each side for 2 hours. After that I soaked it in water and it's still in the patio in a rubbermaid tank.
User avatar
talal
 
Posts: 212
Joined: Jul 31, 2013
Location: Carrollton, TX
Gender: Male

Post Posted: Thu Sep 12, 2013 1:14 am   Re: 55 Gallon build

Shortly after I decided I should just go with an ATBA instead of mounting the tile since I would have to cut the two tops off to have it leveled. So again a trip to home depot to buy some egg crate. I got two sheets perfect size to the length of my tank 47 x 24. The best way I found to cut eggcrate was to use pliers it was fast and easy and in the end I used a cuticle cutter to fine the edges. I only used the eggcrate to make the top so the basking area itself would be escape proof.

12.jpg
12.jpg (23.47 KiB) Viewed 6824 times


13.jpg
User avatar
talal
 
Posts: 212
Joined: Jul 31, 2013
Location: Carrollton, TX
Gender: Male

Post Posted: Thu Sep 12, 2013 1:23 am   Re: 55 Gallon build

For the platform itself I just picked up a ceramic tile with additional tiles that were already cut up small and smothed on the edges which I would use to make a stair like ramp. I got a masonry drill bit and drilled the stairs at the edges and put them together using stainless steel screws and nuts. I drilled the small tiles on the edges so they can be stacked on top of each other while I inserted a nut in between each tile to gape it to increase the length of the overall ramp. For the addtional part of the screw that was sticking out I placed an extra nut to get it evened out so my turtles wouldnt bump into it and injure themselves. Lastly I used some aqueon aquarium silicone to coat the top and bottom of the screws and nuts to make them safer to climb or incase one of my turtles swim into them.

15.jpg


16.jpg


17.jpg
User avatar
talal
 
Posts: 212
Joined: Jul 31, 2013
Location: Carrollton, TX
Gender: Male

Post Posted: Thu Sep 12, 2013 1:25 am   Re: 55 Gallon build

Here is a close up of the double nuts placed at the end of the screws before I applied silicone at the bottom and the top
Attachments
19.jpg
19.jpg (18.27 KiB) Viewed 6826 times
User avatar
talal
 
Posts: 212
Joined: Jul 31, 2013
Location: Carrollton, TX
Gender: Male

Post Posted: Thu Sep 12, 2013 1:37 am   Re: 55 Gallon build

Completion of the basking platform is still due :) I'm still working on it I will keep updating the progress here. Hopefully it should be done by the weekend. I have literally gotten all my concept from this forum. So many great setups and ideas. Let me know what you all think. Meanwhile here is a picture of my turtles chilling in their fav spot

21.jpg


Also my cat Simba who has been a little annoyed since I have been giving most of my free time to the tank setup instead of him :)

simba.jpg
User avatar
talal
 
Posts: 212
Joined: Jul 31, 2013
Location: Carrollton, TX
Gender: Male

Post Posted: Thu Sep 12, 2013 5:01 am   Re: 55 Gallon build

Thanks for the update, I'm looking forward on your ATBA.
FAREWELL DUMBORK
viewtopic.php?f=4&t=36799

follow my blog: dumbork.wordpress.com
youtube: pawii29

pictures and video
viewtopic.php?f=14&t=32931
User avatar
dumbork14
 
Posts: 761
Joined: Jun 18, 2012
Gender: Female

Post Posted: Thu Sep 12, 2013 5:47 am   Re: 55 Gallon build

Wow, that is amazing. Nice job, very nicely done.
Starscream
 
Posts: 318
Joined: Aug 10, 2013
Location: Indianapolis, IN
Gender: Male

Post Posted: Thu Sep 12, 2013 7:53 am   Re: 55 Gallon build

Looks real nice. That's a unique ramp!
1 Male Mississippi Map/Mississippi
1 Female RES/Slidy.
1 DBT White Concentric Female/ Lucky
1 DBT Male/ Spots
(Housed in the same tank)

300 gallon indoor stock tank, FX6 & FX5 filters. Mega-Ray 100w UVB bulb.
User avatar
Kansasslider
 
Posts: 3043
Joined: May 10, 2012
Location: Manhattan,Kansas.
Gender: Male

Post Posted: Thu Sep 12, 2013 8:12 am   Re: 55 Gallon build

Very nice!
Tobi a RES born in 2012
1 dog, 1 teenager, 3 aquariums filled with fish, snails, shrimp and a bit of algae
User avatar
ljapa
 
Posts: 925
Joined: Jul 21, 2012
Location: Near Chicago in IN
Gender: Male

Post Posted: Thu Sep 12, 2013 10:44 am   Re: 55 Gallon build

Awesome setup!
User avatar
devilduck
 
Posts: 957
Joined: May 11, 2012
Location: Chicago, IL.
Gender: Male

Post Posted: Thu Sep 12, 2013 4:56 pm   Re: 55 Gallon build

Thank you guys I can't wait to get it all done!
User avatar
talal
 
Posts: 212
Joined: Jul 31, 2013
Location: Carrollton, TX
Gender: Male

Next

Return to Habitat - Indoor

Who is online

Users browsing this forum: No registered users and 54 guests